Rescuing a Pařez (Stump)

revised version

Click for pdf version of this article.

I have now joined that exclusive club the "Jawa Stump Owners" with the latest addition to my collection.  This is a bike that I bought off ebay in January 2013, from Ireland.  None of the sheet metalwork was left and it was in a dreadful state but as they say on the antique programs "where would you find another one?"

I believe that this might be the only one of this model in the UK as I don’t think they were imported here. The later model 555 Pioneer were sold in the UK and there have been a few within the club over the years. Mike Thomason and Pavel Karasek of the North American Jawa Register have a few Stumps between them, all personal imports from Czechoslovakia, I believe. They have been of help with this project providing information and advice.

The Plan:- My first plan was to tidy up what's there and try and get it running and roadworthy just as it is and think about a proper restoration if I happen to find some panel work later on. Since the Stump has a full rear mudguard, unlike the later Pioneers, it can be useable without any of the bodywork. At a minimum it needed a brake pedal & rod plus a gear change pedal and linkage, all of which can be bought as new replica parts from the Czech Republic.  The missing right hand crankcase cover was more of a problem but I have a later model 05 scooter engine that I could borrow the cover off, that fitted OK.  The clutch release mechanism is mounted inside this cover so I also needed these parts as well.

My bike has a manufactured date of 1957, it has the pressed tank logo, two rear mudguard struts, left hand mounted carburettor and the horn beside the carburettor, making it a “second generation” bike (see Stump Variations box) but there is one variation - the seat is hinged at the front like the later 550s and the 555s.  I am sure that this is original since the two holes in the frame for a side hinge are not present

Stump Variations

There are three series of Stumps:-

The first generation was produced from 1954-1956.  The main difference was the body parts.  The fuel tank did not have the JAWA logo stamped in, just painted on.  The under seat metal panels did not have the bottom 3 lines stamped in, it had only lines on the top.  First generation also had the Jikov 2912 carburettor on the left side of the engine.  Also the rear mudguard had only one horizontal bracket.  Seat opened to the side.

The second generation (1956 - early 1958) had a stamped JAWA logo on the fuel tank, 6 lines stamped on the seat metal panels and the rear mudguard had two brackets (horizontal & vertical). Still had Jikov 2912 carb. on the left side. Seat opened to the side.

The third generation (mid 1958 - early 1959) was the same as second, but had straight handle bars, the Jikov 2914 carburettor on the right side of the engine and the seat opened to the front. Also third generation had a horn under the headlight powered by the dynamo (first and second had the horn alongside the carburettor powered by a battery under the seat).

With thanks to Pavel Karasek from the USA for this information.

These pictures are from the seller in Ireland and show the bike as it arrived with me. Above is the tax disk that was displayed on the bike when I got it.

I notice, from pictures of these, that some of them had a wire loop behind the seat and over the rear mudguard. There was the remains of this on my bike were it has been cut off the swing arm to allow the rack to be fitted.  This served as a hand hold to ease moving the bike around and to lift it on and off its stand.  I decided to make and re-weld a replacement for mine since I was removing the non-original rack.

The poor little thing has been badly mistreated, and "messed about with" over the years. It had an Irish road tax disc dated 1962 attached to it, only five years after it was manufactured, which means that it probably hasn't been used on the road since then but it has been well used and abused - perhaps as a field bike. The bottom two lugs for engine mounting were broken off the frame.  They were there, still bolted to the engine, but all the engine fixings were loose allowing the engine, stand and footpeg bracket to move about and become damaged and bent out of shape. It comes about from people riding whilst standing on the pegs and shifting their weight from side to side to brake and change gear. The footpegs and centre stand are fixed to a bracket that is bolted directly to the engine and to these bottom engine mounts.  I decided that it was all fixable.

First job - remove the old seat and jet-wash it.

Looking better already.  Then follows a complete strip down and thorough clean, repair and overhaul of everything.

Scrapped Parts:- I have tried to use as much of the original bike as possible but a few parts had to be replaced.
The rear carrier is not standard so was not reused.  The seat had rotted away badly so I got a new original pattern one.  The stand was badly bent and worn and showing previous poor attempts to repair it. I was going to replace it but I’ve managed to repair and straighten it up enough to reuse it.  I had to weld plates on the top where it bears on the underside of the engine, although these had to be different thickness each side because previously welded additions had left the whole stand lopsided. The finished bike still has a slight lean to the right when on its stand.

The sheet metal panel (in picture below) forms the back and bottom of the under seat storage area and since I now have found the missing body panels (more on this later) I have refitted it. The other replacements required are mostly regular maintenance items - 2 tubes, 2 rim tapes, 4 brake shoes, drive chain, 3 control cables, a pair of fork gaiters, spark plug and petrol pipe.  I’ve also got a Czech number plate blank and I’ve cleaned up and reused this 1950s tax disk holder that was on the bike when I got it. Later this year the DVLA will stop issuing tax disks, relying solely on its computer records for road tax enforcement, perhaps I will get a replica 1957 tax disk instead.

Stump History

While Jawa's designers were surreptitiously evolving the post-war standard production model, under the noses of the unsuspecting nazis, they were also aware of the need for some very much smaller and cheaper machine for beginners, for youngsters, and for those who just wanted a simple and sturdy runabout.  The pre-war Jawa "Robot", a single cylinder, two-stroke, of 98 cc with bicycle pedals for engine starting and for assisting the engine on steep gradients, had shown how huge a market there was for a low-cost machine with no claims to performance. Jawa actually planned to rejuvenate that type, doing away with the pedals, to capture what was expected to be an enormous market for an ultra-light, ultra-simple, ultra-low-cost machine.

Later Jawa dropped the plan to revive the Robot, and decided to evolve a new and smaller machine from scratch.  The engine for it was already available, at least on the drawing board; it was the work of a beginning young designer, Jan Křivka, who later became head of the Jawa design office.  For some odd reason, the Jawa manager of that time ordered Křivka to design that engine at home and keep its existence secret.  After a change in the management, the blueprints spent years accumulating dust in a bottom drawer, from which they were rescued only when work started on the new Pioneer.

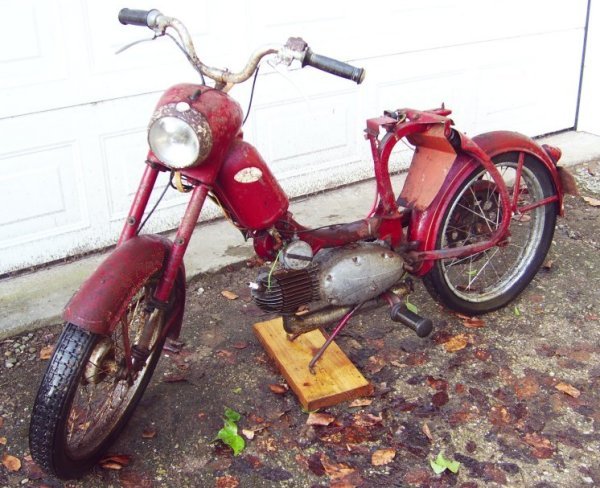
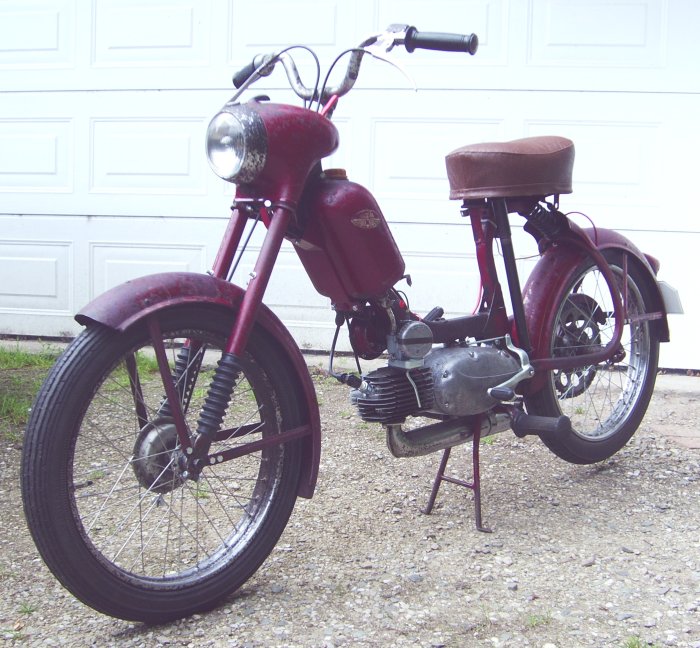
This smallest of all Jawas appeared on the scene in the fifties shortly after the 500 cc "Half-liter", the most powerful type of that make.  The design team, made up of M. Kubíček, J. Mráz, K. Mareš and J. Šťastný, adopted a modernised version of Křivka's engine, a design that differed from all other Jawa power units in having a horizontal cylinder. This two-stroke, single cylinder of 49.8 cc had a power output in excess of 2 HP, and in conjunction with a three speed gearbox propelled the tiny machine at up to 50 km/hour - as much as anyone could expect from a mere 50 cc.

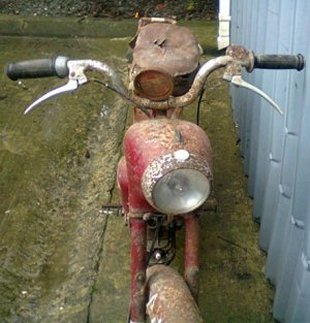
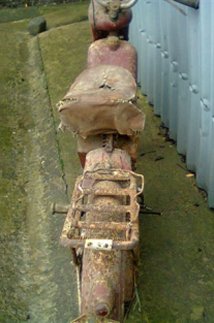
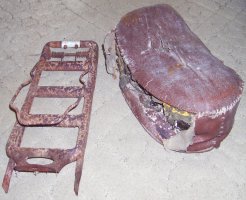
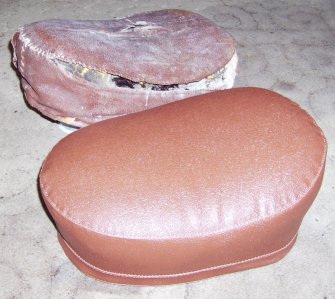
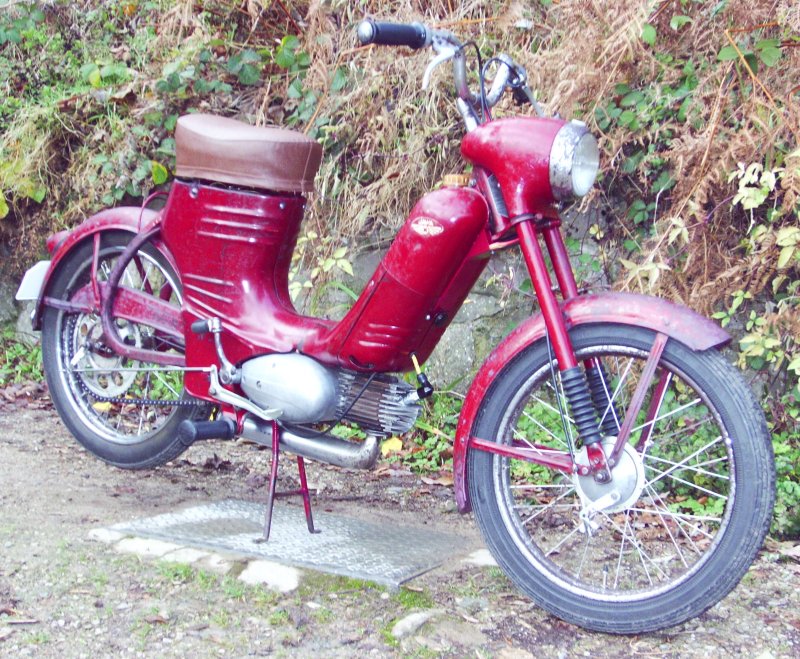
All this may sound commonplace nowadays, but in that far-off time the Pioneer was a spectacular breakthrough, another Jawa trend setter. The first model had a saddle which was about as elegant and comfortable to sit on as a tree stump, and that got the type nicknamed "Stump".

The Stump was evolved in Prague, but its production was soon transferred to the Považské Strojárne plant at Považské Bystrica in Western Slovakia.

From Czech Motor Review 8/1989

Frame Repairs:-  The broken engine mounts and signs of welding from previous repairs are shown in the first picture below.  Centre picture shows the old welds cleaned off the frame. Also new backing plates made from mild steel sheet to overlap the original breaks and, hopefully, reinforce the replaced lugs.  Last picture shows the lugs and backing plates welded on and stitch welded together down their edges.

In the picture below you can see the remains of the broken off bracket that acts as steering stop and holds the front cover plate. I made a replacement bracket from 16g mild steel, shown ready for welding in place. This was made largely from guesswork since I don’t know what the original would have looked like. The dimensions were made to suit the bottom steering yoke and the new, replica, cable cover plate that I bought from the Czech Republic.  The picture below right is the rear swing arm showing the remains of the old cut off handle and my replacement made from 3/16” mild steel rod.  Apart from straightening out a few lugs, that completed the frame repairs.

I saved all fixings as I removed them and put into marked bags for future reference. Some are not reusable and many are non-original so I set about finding replacements where needed, in zinc plated steel, as close to the originals as possible.  A difficulty was finding the correct pan head M5 and M6 screws with a fully rounded head that the factory has always used, right up to the last Babetta models.

The right hand crankcase cover was missing. The early Pionyrs, up to the model 05 scooter, have a clutch mechanism for which the cable enters the crankcase cover from underneath.  I bought a used cover, off ebay from Germany, for a model 05 which fits OK but needs these, slightly different, clutch release parts, borrowed off a spare model 05 engine..

The first few new replacement parts that I needed. Most of these bought from Fichtl Krámek in the Czech Republic, at www.fichtlkramek.cz/pokec2/ These include the sheet metal cable cover for the front of the tank (missing from my bike), one missing footpeg rubber (I can reuse the other), gaskets and ignition components. Also new grease nipples - one for the left hand end of the rear swing arm pivot, and two others were to be used on the forks but I finished up reusing the originals.

I made a new bracket for fixing the spring cover plate to the rear swing arm, made from 18g. mild steel sheet, with one nut welded to it.  The one that came off the bike (shown below left) can’t possibly be the original as it is so rough, so I guess that it’s someone else’s attempt at making a replacement part..

Carburettor cleaned and rebuilt with a new loop on top of the enrichment plunger from stainless steel wire and new proper studs fitted into the manifold flange.  Note the round mark on the brass slide where someone has tried to use too long a screw to fix the carb to the manifold.

The original petrol tap (on the right) has been rebuilt and the broken off lever replaced with Meccano parts. The lever is higher up to the seating face, so doesn’t line up with the slot in the later cover that I am using and it was leaking slightly, so I have used the later Jikov tap on the left.

Next came the engine. I bought four bearings and three seals as an engine set from www.Motoren.sk in Slovakia along with some other parts including a first oversize piston kit and a gasket set.  The bearings that came in the set were sealed type. I went ahead and reassembled the engine with the bearings as they were, but started to doubt if this was a good idea. I asked advice from a couple of other club members and realised that it was going to be necessary to removed the seals.  These type of bearings are OK on wheels where you need to keep the grease in, and the dirt out, but when used in an engine, the seals will prevent the gearbox oil, or in the case of the two crank shaft bearings, two stroke oil, getting into the bearings.
I had to strip the engine again to remove the seals, they easily lever out with a small screwdriver, from the inner faces of both crankshaft bearings, from the inside of the right hand gearbox bearing, and from both sides of the left hand gearbox bearing. That is, all faces which are exposed to oil.

Engine stripped for repair.
It looked as though the engine had been stripped and rebuilt previously but reassembled incorrectly so it hadn’t been run since. The kick start shaft return spring was incorrectly positioned so didn’t work – these engines are started by kicking the lever forward not backwards as on the bigger Jawas - and a damaged piston and rings were fitted. The bore was in very good condition and it may have been re-bored but the old piston refitted. Measurements showed that it needed a first oversize piston & rings. I have fitted a new 38.25mm piston set - piston, 2 rings, gudgeon pin and 2 wire clips. A new clutch plate needed the cork inserts rubbing down on emery paper to flatten them.  I also replaced the primary drive chain and some of the engine assembly screws. Note my tray to separate engine parts by function and position within the engine, to help identification and make reassembly easier – an old cutlery tray out of a kitchen drawer.

Although the gear selector mechanism looked OK and was replaced correctly, during its first test runs there turned out to be a gear selection problem with the bike dropping out of second gear then eventually jamming in first gear. The engine had to be stripped for a third time to sort this out. The gears, selector fork and its guide rod all looked perfectly all right so the problem seemed to be the selector mechanism.  I bought a complete replacement selector assembly from www.motojelinek.com  
There are five notches on the cam plate; 1st + neutral + 2nd + neutral + 3rd.  Note that on the replacement plate (on the right) the 3 gear notches are cut a good bit deeper than on the original plate (left).  The Workshop Manual for this model 550 and the later model 555, shows instructions for deepening these notches yourself in the event of the bike dropping out of gear, so this must have been a known fault with the early bikes.  The replacement selector also has a better spring for holding the pawl engaged with the cam and the ratchet mechanism is redesigned to prevent the cam plate moving too far and thus allowing the pawl to fall off the end, which seems to be what had happened to mine.

The frame and body parts off the bike, all cleaned up and the rusty bits treated with Kurust rust converter to leave a black phosphoric finish, this gives the bike a sort of distressed “antique” appearance.
I don’t now plan on fully restoring this bike. It would involve stripping the whole thing back to bare metal for re-spraying and replacing all the chrome, plastic and rubber parts with new.  What would be the point of that? It wouldn’t be the same bike then, would it?
I just want to preserve as much of the old paint work (and chrome) as possible so I have freshened it up with some dark red “Colour Magic” polish and used an old fashioned solid wax polish all over. The wax has shined up the remaining paint and will provide a bit of  protection from further rusting and help to keep out the rain.

The few chrome parts and other small parts cleaned up and given the same black phosphoric finish. All ready to go back together.
A lot of people are going to disagree with me here but I don’t see the point in the spotless, gleaming, ‘polished within an inch of their lives’ sort of bikes that you see at shows.  I think that a 56 year old bike should look like it is 56 years old, not ‘better than the day it left the factory’.  I really like to see old bikes in as original condition as possible, like my 1960 Jawetta on the Home page, which is completely original right down to the scratches and paint chips.
This one is a little bit further “gone” than I would have liked and will not be fully original because by the time I got hold of it there were a few parts missing that have had to be replaced with new replica parts, but at least they are to the original pattern and made in Czech or Slovak Republics.  It is amazing just how many replica parts are available now for old Jawas and CZs from various suppliers.  There are links in this article to three such suppliers that I used for parts for this project.  A word of warning though.  I have found that some parts, although very closely resembling the original, sometimes are not quite an exact copy. Be prepared to tweak parts to get an exact fit, for instance, the new brake pedal I bought had to be bent out slightly, to clear the crankcase cover.

The rear wheel still has some chrome on it and several spokes looked like they had previously been replaced. I replaced most of the rest, which were very rusty, with 2mm x 190mm chromed steel spokes off ebay.  The Stump is unusual in using 2mm spokes - the same size as normal bicycle spokes. Mopeds and motorbikes normally have at least 3mm diameter spokes.  None of my other Jawa mopeds, even the older ones, have spokes this thin.
Many of the front wheel spokes were nearly rusted right through and the rim had virtually no chrome left and a rust hole in one place. I covered the hole with a thin stainless steel patch on the inside and covered it with thick fabric tape to protect the tube, then filled and reinforced the hole from outside.  I replaced all the spokes. They are odd lengths of 156mm on the brake side and 185mm on the other, made specially for me in stainless steel by a local Cycle shop.  I could have bought a new rim or even a complete wheel from some of the Czech or Slovak spares shops but didn’t for the reasons given above. I think the repair will stand up to use, after all, it is never going to be doing more than about 30mph.
The rear tyre is the one that came off the front wheel, it might even be the 1957 original but it is still quite useable with no cracks.  I found a new Mitas ribbed tyre at Stafford Show in the correct 2.50” x 16” size for the front.

The rotted original seat and a new original pattern replacement bought from Motoren.sk My bike has the later ‘front hinged’ type of seat. This is the only thing that stands out a bit and spoils the original look.  I looked at the possibility of keeping the original one but as well as all the split seams and tears in the vinyl, the foam is disintegrating and turning to dust.

Some of the other new parts from Motoren that my Stump needed. I bought a new centre stand but didn’t use it in the end, as I was able to straighten and repair the original one well enough to use it. The original brake and gear change pedals and operating rods were missing but new replica parts are available as are the original chrome plated brass “wing nut” brake adjusters shown here, and various rubber parts – Fork gaiters, which had disintegrated, and brake and kick start rubbers.
Most parts are very reasonably priced from the suppliers mentioned here but the adjusters cost 8.50 euros each – about 7 quid for an M6 wing nut! I guess that they are specially manufactured, in small batches, to the original pattern. Worth it for the sake of originality.  Whilst most parts from Czech and Slovak republics are quite inexpensive, postage to the UK adds quite a bit and if you have to pay by bank transfer in Euros, which many suppliers require, bank charges can be very expensive (they’ve got to get money for those bonuses from somewhere).
The replacement cables came as a set of three for front brake, throttle and clutch.  The clutch cable turned out to be a bit too short for my bike, I could have used it but the bends would have been too tight for my liking, so I made up a slightly longer one instead from spare cables. Also I needed a new rear reflector as close to the 1957 one as possible, my original was missing.

This is a picture of the bike assembled complete before I got the bodywork panels from Slovakia.  I was able to start it up at this stage and it started third kick and ran beautifully.

The body panels that were missing from my bike when I bought it. The full story of how I obtained these parts was told in Torque issue 8/2013. Ádám Boczán in Slovakia went to a lot of trouble to locate these for me and posted them over to me all at quite a fair price.  He even made sure that they were the correct colour to match so I would not have to repaint them.

When the bodywork arrived it needed cleaning up and straightening out. The two large side panels particularly needed some bends and dents flattening out and then bending to the correct curves to fit together and to fit to the frame. These came off a couple of different bikes. The large side covers are the correct ones for my version of Stump but the three panels in the middle, for below the petrol tank, are off a later version. They fit perfectly and look the part, the main difference being the curved slot in the small right hand cover is for the later, right hand side mounted, carburettor/air cleaner and is unnecessary on my bike.  Also the slot for the petrol tap in the left hand cover doesn’t line up with the lever of my original tap.  Later bikes must have had a different tap more like the Jikov taps that are fitted to all later Jawas and CZs. I made up a replacement tap to suit the slot from parts in my spares.  The body parts even came with an original black plastic headed screw/knob that holds the left hand side cover closed and allows access to the carburettor, and the screw to open the right hand cover.  Both covers are hinged.  Curiously the later models had a quick release left hand panel even though the carburettor was on the right.

My version of Stump has the carburettor mounted on the left hand side and has a plunger to flood the carb for cold starting. This requires the wire hook, plastic knob and grommet shown here, bought as new parts from fichtlkramek.cz, and the wire needs to pass through a hole which was missing from my slightly later centre cover. After measuring up carefully and studying pictures of other Stumps, I drilled a 12.5mm dia. hole 45mm from, and level with, the centre fixing screw.

I had used a lot of new nuts, bolts and screw to put it back together, of the correct type and sizes, in zinc plated mild steel, as original.  Some of these stood out a bit as much too “shiny” so I have gone through all the old fasteners that I removed and replaced as many of the new fixings as I could, particularly the most visible ones, with old rusty ones. A few fixings came from my jars of old fixings removed from other Jawa-CZ bikes and mopeds - never throw anything away. Particularly difficult to replace were M6 pan head screws. In Czechoslovakia they have always used a very rounded head for pan head screws which are different to the more flattened head that are now available. I managed to find on ebay some M6 screws of the correct shape in unplated mild steel and stained the heads with Kurust to “age” them.
I know this might all seem a bit odd to many, and that nobody would know any difference between a few wrongly shaped screw heads anyway.  Our club is normally, thankfully, free of this sort of nit-picking, but I would know the difference.  It’s just my strange ideas on bike “restoration”!

Below is the finished bike following a successful test ride after fixing the gear selector problem as described in part 2 of this story. The first proper test ride threw up a problem with the gearing.  When I got the bike, it had a 13 tooth gearbox sprocket fitted but the parts book said that this sprocket should be 14 teeth. I bought new sprockets of both sizes from Motoren and had fitted the 14 tooth one, this proved to be too high geared for the bike as it was not accelerating from stationary as cleanly as I would expect so I have swapped back to a 13 tooth one for now. Perhaps I will try the 14 tooth one again when the new piston and rings have run-in a bit.

Post script:-
I thought I had finished recommissioning this bike and writing this story, but she had one last trick to play on me. When started up initially, the lights were working very well except for a blown dipped beam. These bikes have a 6v 20 Watt permanent magnet generator that just powers the 15W/15W dipping headlight and a single 5W tail light bulb without a regulator or battery. The ignition power comes from a separate set of coils inside the generator feeding an HT ignition coil, and the horn is powered separately by a pair of torch batteries under the seat.
After my rebuild to fix the gear selector, the headlight was now only showing a very dull glow and then only when revved quite high. This isn’t uncommon with such old electrics and usually signifies a dodgy switch contact or a poor earth or dirty connection somewhere. I had refitted all the original wiring with the original terminals but cleaned everything and re-soldered all of the connection points and thoroughly cleaned all switch contacts, so I hadn’t expected any problem there, and I had just replaced both bulbs with brand new ones.  To be sure, I connected a small 6v battery -ve to the engine casing and +ve to the white wire from the lighting generator terminal.  Perfect lights.  I operated both the switches, turned the lights off and on repeatedly with no flickering or sign of a bad connection. So it had to be the generator - right?  I wondered if a short circuit or broken wire in the windings was the fault and I have heard of cases of rotors becoming demagnetised. I first checked the windings with my multi meter and all seemed to be as it should - about 1.5 ohms between the output end and the stator body on both lighting and ignition coils and no short circuits.  I removed the generator from the spare model 05 engine that had already donated the clutch release parts so I had 2 rotors and 2 stator assemblies which I swapped over trying every combination of rotor and stator all gave the same very dim lights.
After every change of parts, I had to readjust the points gap and reset the timing and wheel the bike outside the garage to start it up to see if the lights had improved.  It gradually started to dawn on me that if the generator was faulty, how come it starts easily every time and ticks over OK? Having spent several hours over three days trying to fix it I was getting desperate. The only other thing that was different to before was the new bulbs. I refitted all parts of the original generator, found the old bulb in the bottom of my garage waste bin and put it back in the headlamp. Outside again, start it up, switch on the lights - working again.  The dipped beam was still broken of course, but main beam was back to full brightness as before.
How could a bulb cause that trouble? The box was printed 6v 15/15w, the bulb was clearly stamped 6v 15/15w so I put it across a 6v battery and ammeter - it was lighting up OK but drawing 5.5amps on each filament, making it a 35w bulb not 15w.  No wonder the 20w generator was struggling to get any light out of 40 watts worth of bulbs.  I had bought two of these particular bulbs and both were the same.  I checked a few other bulbs I had in my spares boxes and found another one marked 15/15w that drew about 2.5amps, about right for 15w at 6v, so fitted that one which now worked as it should, slightly dim at tick over gaining full brightness as the revs rise a little.

The moral of this story -  The fault might just be the one thing that you have decided couldn’t possibly be faulty.

Footnote:-
My Stump made her first public appearance on the Jawa-CZ Owners Club stand at the Manchester Bike Show at Event City, Manchester, on 22-23 March 2014. 
I was lucky enough to win the “Unrestored Classic” trophy.
12 months hard work to make her look like I have done nothing to her !

.